Hello and welcome back to another installment of Basement Builds! I am very excited for this one and have been thinking about it since my last build. As promised, this model of the Briefcase Boombox is Bluetooth and rechargeable. After all the positive feedback from my friends and family on the last build I though these would make great gifts for the upcoming holiday season and headed straight for the thrift store to start this project.
WHAT YOU’LL NEED:
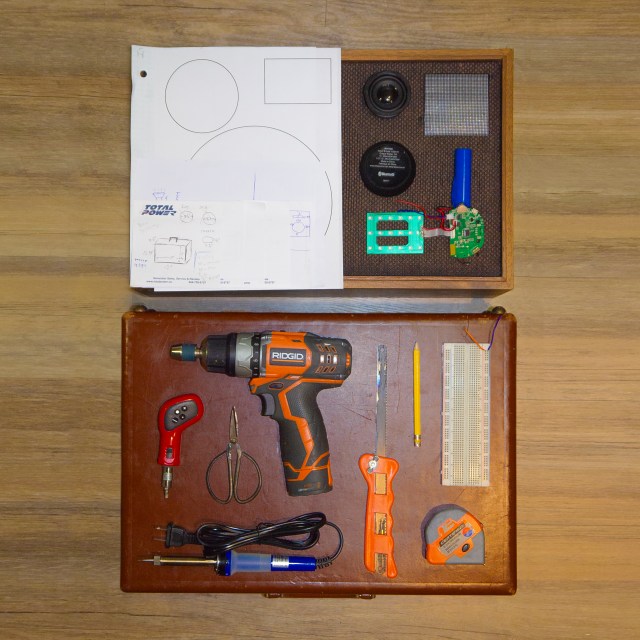
- Thrift Store Speaker Cabinet
- Sketches and plans
- Disassembled Bluetooth Speaker
- Screwdriver
- Drill
- Scissors
- Soldering Equipment
- Saw
- Pencil
- Breadboard
- Measuring Device
- Thrift Store Briefcase
Step 0: Obtain Better Speaker Cones

Removing the protective screen to access the speaker cones
The two main goals for this project are a real vintage look at a real low cost so the thrift store is where we should look for most of our parts. I was able to find both a speaker cabinet and a briefcase for under $5 at my local Value Village which make up most of the final product. What I couldn’t find was a Bluetooth speaker but sometimes these come as promotional item in cases of beer so check out your local liquor store for that one.

Removing the speaker cones
Unfortunately no companies were running such promotions at the time of this build so I had to go to an electronics store. You don’t need anything fancy because a large part of the sound quality comes not from the internal wiring but the speaker cones which we will be replacing. Much of the cost comes from the casing which we will be replacing as well so I picked up the cheapest Bluetooth speaker I could find which also happened to be around $5.

Internal wiring of the speaker cabinet
Disassembly of the speaker cabinet was quite easy as we can see through the picture gallery. This particular unit has a protective screen that popped off very easily and the cones just unscrewed out of the cabinet. Pay attention to the internal wiring of the cabinet as we will want to try and match this in our briefcase. My cabinet had the two cones in parallel with a resistor and capacitor before the tweeter (smaller cone).
Step 1: Disassemble Bluetooth Speaker

Circuit board from Bluetooth speaker
Once your speaker cabinet is all apart it is time to tear open that Bluetooth speaker. All Bluetooth speakers are different so I can’t offer much guidance here but once apart they ought to all be fairly similar. Inside should be a circuit board with lots of surface mount components that you don’t really need to worry yourself with. All you will need to do is take the two wires attached to the speaker and disconnect them. Try to leave yourself a bit of wire to work with as it is easier to solder wire to wire than wire to circuit board. In my Bluetooth speaker there was a red and black pair leading to the battery and a red and blue pair leading to the speaker. I just cut these red and blue wires and pulled everything else out of the casing to test.
Step 1.5: Test Circuit with Your New Cones (recommended)

Testing in progress
I think it’s a great idea to test things out before getting to far in to make sure things are going to work the way you think they are so if you’ve got a breadboard I highly recommend testing. You’ll want to take the positive (+, often red) and negative (-, often blue or black) leads and connect them to the same node as the positive and negative leads from your speaker cones; this is called connecting them in parallel. Series would be if we connected the leads from positive (+) leads on one speaker cone to negative (-) leads on the next. This has its own advantages which you can read about here and wire this circuit however you like. The great thing about a breadboard is you can quickly try both ways and hear the difference yourself!
Step 2: Prepare Your Briefcase

Circles printed to match the size of the speaker cones

Uh oh! This is why we measure twice
Be sure to plan this out. The last thing you want is a bigger hole than you need which will compromise the structural integrity of the briefcase face. We can see in my picture that I measured wrong the first time and had to print a new sheet of paper so the speaker would fit better. This is where measuring twice can really save your ass. Once with the ruler and once with the template.

Layout planning

First cut
I then used the circles cut out to see what the boombox would look like when complete. Once happy with the layout go ahead and cut out those hole.
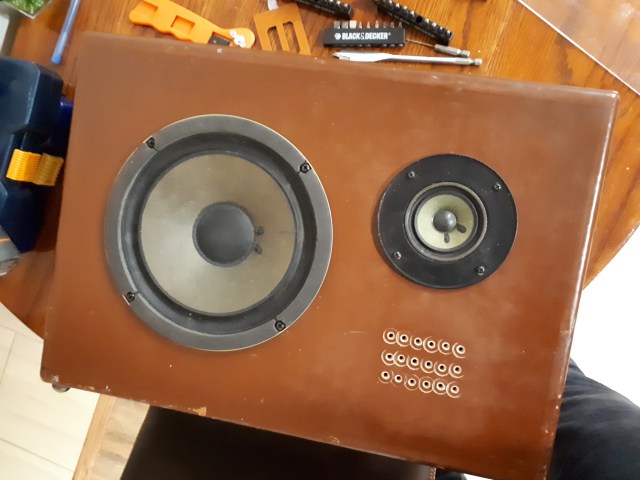
Step 3: Affix the Speakers

Speakers in place
Here I drilled the speaker cones directly into my briefcase wall with the originals screws in the speakers as I felt the briefcase is sturdy enough but you may want to reinforce this with a thin sheet or particle board or more cardboard if you don’t trust your briefcase. Get ready to do some sanding as I recommend cutting the hole on the smaller side and sanding to fit.
Step 4: Mount Your Circuit Board

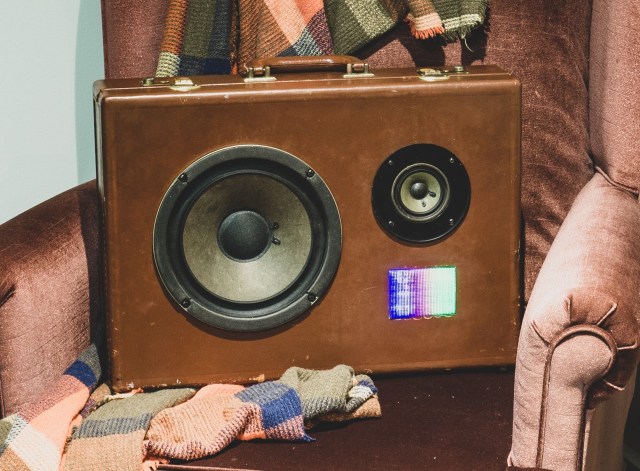
LED board mounted over a little window to shine through
In my picture I have not yet put the circuit board in but I just attached it with a little hot glue right onto the inside of the case. Pictured left is an LED board that came from my Bluetooth speaker I wanted to integrate. Little straps of leather salvaged from the lining helped us get it in the perfect spot. Not all Bluetooth speakers will come with lights so this step is going to vary from build to build. Feel free to get a little creative here with your wiring and use the space inside of the case here to your advantage.
Step 5: Wire It All Up

Cover up that bare metal

Solder connections for a more durable build
With everything in place all that’s left is to solder all the connections for the speakers you swapped out. A little sketch of your circuit around your workspace can be very helpful. A set of helping hands can be extra helpful here. My girlfriend gave me this set for my birthday as she got tired of being my set of helping hands. It’s a good idea to wrap your connections in electrical tape once cooled to prevent shorts.
Step 6: Clean It Up
Almost finished
That’s it! You’re pretty much finished. All that’s left is to clean up your build a little bit, maybe taping down your wires and adding finishing touches to the outside. We didn’t put any controls on the outside of this unit because it’s Bluetooth so you’ll have to open the lid to turn it on but after that it’s all from your phone.
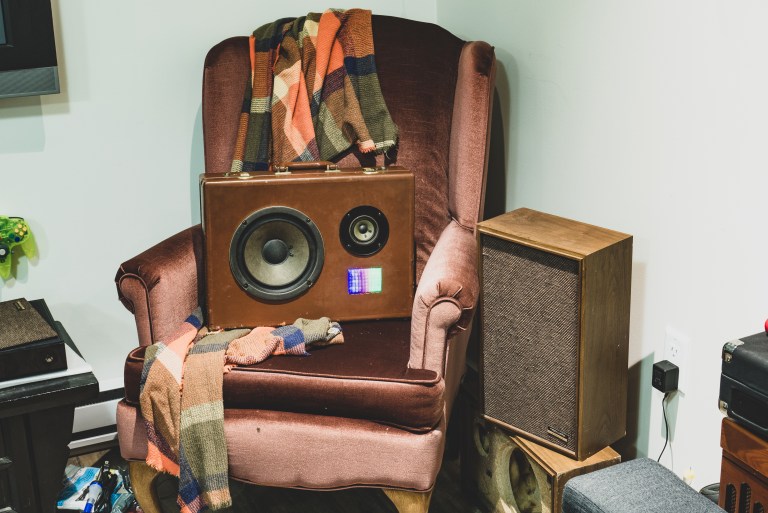
Finished product (photo courtesy of the wonderful Emily Fitzowich)
P.S. Why Buy Gifts When You Can Thrift Gifts?
These Bluetooth boomboxes get a lot of attention and will make great gifts this holiday season. And if you’ve got to travel I can tell you they definitely fit in overhead bins no problem and can start over a dozen conversations on only two plane rides.

This is awesome! I am going to have to try this out!
LikeLike