Hello and welcome to the first instalment of Basement Builds! In this series, I will be showing you how to make various electronics. As a musician, I like to focus my builds on audio equipment but I will occasionally branch out if I feel I have something interesting to show or a special request. I would like these Basement Builds to be as accessible as possible so I will focus on keeping them as simple and low-cost as I can.
To start off the series I wanted to recreate my first ever project which was making a Tin Can Microphone. My primary motivation behind this build was to be able to sing along with my guitar without buying too much extra stuff. I already had a guitar amp so did not want to buy a microphone amp as well. I also liked the idea of not having to carry around two amplifiers. An XLR to quarter-inch adapter would have allowed me to send a regular old microphone through my guitar amp but this did not appeal to the engineer in me. I will not be going into too much technical detail with this series and keeping it centered around the build itself but I do encourage you to look more into the theory if you are interested. With all that being said, let’s get started!
Step 0: Gather Required Materials
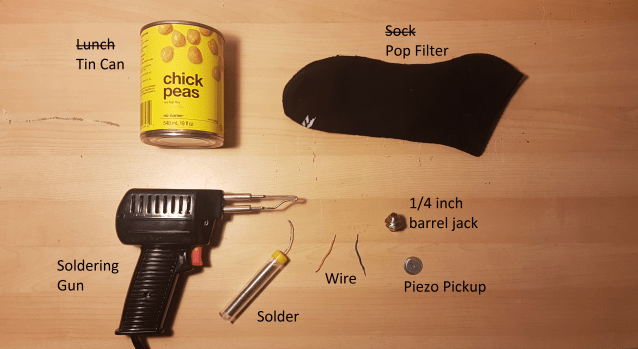
For this build, you will need a few things; most of which you will probably already have at home and the others I will include links for.
- Tin Can
- A Thin Sock
- Soldering Gun (or iron)
- Solder
- Flux (optional)
- Wire (unless your piezo pip already has leads on it)
- 1/4” Barrel Jack
- Piezo Pickup
With all of your materials gathered, we are ready to begin.
Step 1: Prepare Your Can
 The first thing you will have to do is get the can ready to act as the housing for your microphone. You can use any can that you like but I recommend choosing a sturdy can that fits well in your hand or gig bag. Once you have emptied and cleaned your can you need to pierce a hole in the side or bottom. I chose the side so the mic could be set down while in use. The hole will have to be just large enough for the end of the barrel jack to stick through snugly. Be careful not to make the hole too large or you will have trouble getting the jack to stay.
Step 2: Soldering
With the housing ready to go, it’s time to connect the innards of your microphone. I chose to solder my parts together to increase the durability of my build but electrical tape can work in a pinch. If you are new to soldering I recommend you head over to youtube and watch some tutorials before going any further. Also remember to always wear safety goggles and do your soldering in a well-ventilated area.
Step 2.1: Attaching leads to your pickup
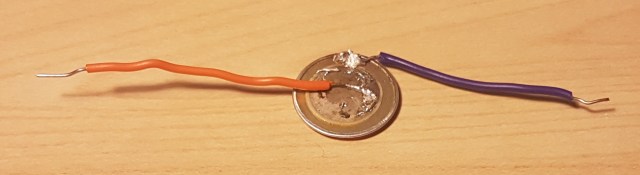
For this build, I only used parts found in my basement so this step may be unnecessary for you. Most Piezo Pickups already have leads attached to them but I pulled this one out of an old McDonald’s toy (I think) and the leads came off. To put new leads on a Piezo Pickup simply solder two wires to the bottom of it. One wire will need to be attached to the outer ring and the other wire to the inner circle. These correspond to the positive and negative parts of the pickup. Using a bit of flux and leaded solder will help you get a much cleaner finish than I was able to.
Step 2.2: Attaching your pickup to the barrel jack
 With leads on your pickup, it is ready to be attached to the barrel jack. You will need to affix the two leads from the pickup to the two wings on the barrel jack. It should not matter which lead goes on which wing so long as you attach one to each. If you are not comfortable with soldering this step can be done without so long as you got a pickup with leads and skipped the last step. Simply feed the wire through the hole, fold it back, and give it a little twist.
  Those of you conformable with soldering should add a little bit here to increase the durability of the connection. Finally wrap the connection in electrical tape or shrink-wrap to finish it off an avoid shorts.
Step 3: Putting It All Together
 Now all of the components are ready to go and the final step is assembling your microphone. This part can be a bit tricky if you have big hands like me and cannot get them inside your can. Needle nose pliers can be quite helpful here. First, take one nut and the washer off of your barrel jack. Then feed the end through the hole in the can and fasten the washer and nut back on the jack from the outside of the can. This should hold the jack firmly in place. Next, using a piece of double-sided tape (or any adhesive of your choosing) secure the pickup to the bottom of the can. Finally, stuff the thin sock into the can, toe end first, and fold the top down over the rim of the can. This will not only cover the possible sharp edge but also act as a pop filter for better sound quality.
Step 4: Rock Out!


You’re done! There’s nothing left to do now but clean up your workstation and have fun playing with your very own microphone. My personal favorite thing to do with this Tin Can Microphone is to experiment passing it through guitar pedals. Since we used a 1/4” barrel jack rather than an XLR you can use your guitar patch chords to send this mic directly to your pedals. Throw some distortion of your voice, or delay, or maybe even send it into a loop pedal synced with your guitar to really kick things up a notch. I hope you have enjoyed this tutorial, please leave a comment and stay tuned for the next Basement Build!
